Most projects reach a phase where it is necessary to verify that the chosen concept meets the expectations defined at the start of the design work. To this end, a number of tests are carried out, the results of which should help to carry out this verification. To ensure that the verification process runs smoothly and takes the shortest possible time, we often build a verification plan, also known as a validation plan. In the APQP process, we usually have two such stages. DV (Design Verification) – verification of the product design and PV (Product Verification) – verification of the designed manufacturing process and its impact on the final product. There may, of course, be more verification stages, which may result from the specifics of the product, the process or the expectations of the market (customers).
Common questions that arise during these phases are:
- How many tests need to be done to be 100% sure of verification?
- How many units need to be tested to be sure the results are reliable?
- Do you need to test all possible variations of the product?
- How many and which parts need to be measured to confirm the nominal values and tolerance ranges defined on the drawings?
- Can the scope and definition of the test specification be changed between DV and PV?
- What tests to perform and how to interpret them, if the product under test is not dedicated to one customer defined what to test and how to evaluate the test results?
- What to do if the results of one or more tests end up negative (NOK result)?
This article will attempt to answer these questions.
To prepare for product validation, it is useful to answer the question: what is the purpose of this phase of the project? The answer to this question will guide us in the next steps of preparation.
The main purpose of the validation process is to verify the technical risks identified during the design work to date. In other words, it allows us to answer the question: how big (or small) is the risk of complaints or customer dissatisfaction once the product is available on the market. A complaint related to the failure to fulfill the declared function of the product or a non-conformity with the documentation.
Speaking of risks, we first need to find places in the project documentation that contain a description of the identified risks. The most obvious place is FMEA analyses, both design and product (for practical tips on how to integrate DFMEA into project management, click here). Another place will be the document(s) that describe the expected performance of the product, the market segment it is intended for, the performance ranges, sizes, features it should deliver. All this information will ultimately be in the technical documentation (Technical and Operating Documentation or Technical Data Sheet). The documents containing the listed information may or may not contain information about the level of risk. So why do I mention them? If any of the listed features are not provided or guaranteed by the product, the consequence will be non-conformity, which will most likely lead to complaints (or customer dissatisfaction). Another source of risk is technical drawings, with all the information contained therein. Often the drawings refer to specifications (internal or publicly available) that the product must meet. Failure to meet them leads to the consequences mentioned earlier.
There may also be other, industry-specific specifications or documents that specify requirements that the product must meet. They, too, should be considered as a source of risks that should be addressed in the validation plan.
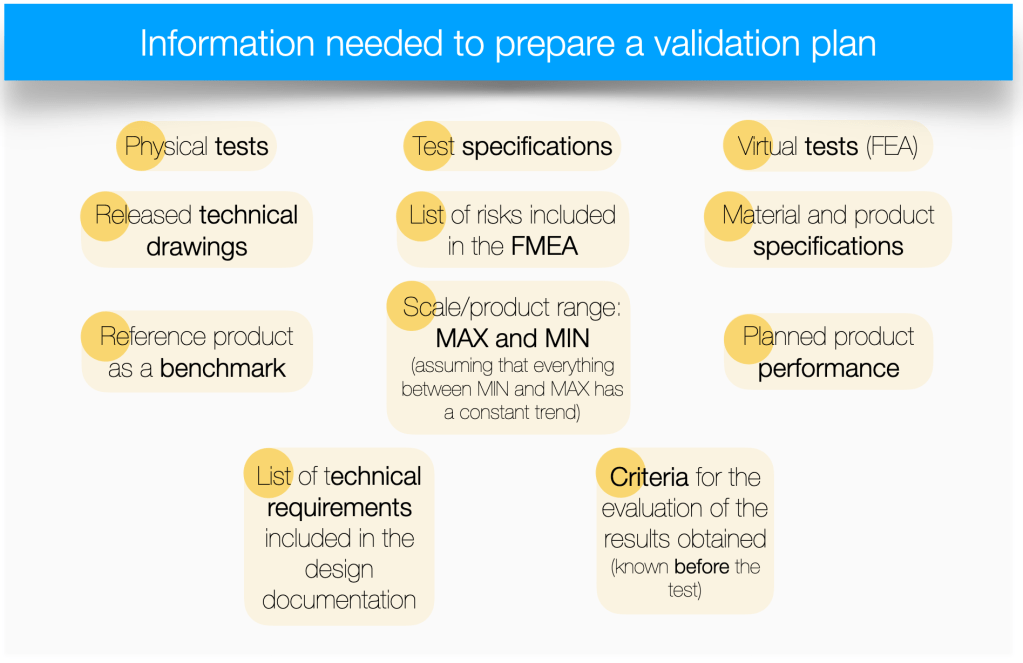
Taking into account the above information, it is possible to list several prerequisites for being able to proceed with the preparation of a validation plan (in the DV phase). These are:
- Frozen / released in the documentation management system (from PDM) product design.
- DFMEA analysis including a complete list of risks with their specified level (RPN risk priority number or high/medium/low level).
- Performed analysis for critical / significant dimension chains (TCM – tolerance chain management).
- Released technical documentation (drawings and specifications) (for information on minimizing the risk of errors in technical drawings, click here)
- Executed initial tests to verify new test methods.
- Released test specifications for all tests included in the validation plan.
In order to realize the importance of the above conditions, let’s consider what might be the consequences of not meeting them before preparing validation plans? Each deviation creates a new risk. As a reminder, the validation plan allows us to analyze and verify risks. If for some reason we decide on such additional risks, we should transparently communicate this to the entire project team. The most common consequences caused by failure to meet critical conditions, are delays and unplanned cost increases in the project. Some examples below:
- Product design is not frozen – consequently, during the creation of the validation plan, the design may change. If the change is to an important function then the validation plan will not take it into account. In addition, the DFMEA analysis will not include an analysis of the risks associated with these changes, so the risk of not planning appropriate tests is high, including the need to repeat the validation plan,
- DFMEA analysis is incomplete – as above, if it is incomplete then the risk of not scheduling appropriate tests is high, including the need to repeat the validation plan,
- Dimensional chain analysis is incomplete or omitted – if the conclusion after some test, is a proposal to change the tolerance, the impact of this change on other dimensions will not be known – so it could potentially result in the omission of unidentified risks or be a reason to repeat validation plans,
- Drawings or specifications are incomplete and/or unfrozen – risks as above,
- New test methods are unverified qualitatively (no MSA) – if after the validation plan is completed, the test method is found to have a GRR greater than 30%, the test method should be changed and the tests repeated as part of the next validation plan.
Let’s assume that all the necessary conditions have been met. It’s time to start working on the validation plan. Think of it as an investment in the future of the project. A correctly prepared validation plan will result in valuable contributions to the next phases of the project.
The methodology is simple. For each identified risk, assign a test to validate the risk. For each risk, it is useful to ask the following questions:
- Which test is best suited to verify this risk? Keep in mind that you only choose from tests that are standardized and have a proven GRR – if you don’t have such tests prepared, you have to accept the risk of having to perform additional tests in the future or extend the time to prepare a validation plan,
- Which product variant should be tested for this particular risk? Perhaps more than one? A common simplification is to test the MAX and MIN variant, assuming that all variants in between would behave the same, or at least with the same trend, during the test,
- What is the OK/NOK criterion for the planned test. This is one of the key questions that should not go unanswered. Why? Imagine the situation that you are planning to perform a test. A test that is standardized. Your team has performed it many times. It is fully aware of what kind of results can be obtained. If, in such a situation, the team cannot clearly define the expected result, which will be qualified as OK or NOK, then it will also not be able to evaluate the result received after the test is performed. In such a situation, you should ask yourself whether you are sure you have chosen the right test, or whether the test is properly standardized and your team understands its essence. The inability to define an OK/NOK criterion for a test result (before the test is performed), should always be taken as a serious risk. The only exception may be a test of a cognitive nature, which is part of the validation plan, but is not linked to a specific risk and its result will not matter for the final determination of the outcome of the validation plan.
By asking the above questions for each identified risk (in the documents mentioned above), we create a validation plan. This method allows you to plan and verify all registered risks in the project. Another advantage of this method is that the end of this activity is clearly defined. After considering and analyzing all risks and planning the necessary tests, you are sure that no risk has been overlooked.
Particularly for New Product Introduction (NPI) projects that target a new product in a company’s product portfolio, it is common that while working on a validation plan you will identify a test, or a variant of a test, whose test procedure does not exist. This is perfectly normal. After all, the team is working on a completely new product from the company’s perspective, so the lack of adequate test procedures should not come as a surprise.
Another element that will require additional design work may be the elements of individual test procedures. When defining tests for variants of MAX and MIN test parts, there is often a need to design and implement additional fixtures, interfaces, etc.
There may also be a need for testing that the project team cannot carry out with the company’s existing resources. In such situations, it is worthwhile to conduct a make-or-buy analysis. For tests that seem crucial in the perspective of the current and subsequent planned projects, it is worth considering the purchase of test infrastructure (keeping in mind that the design and investment process is generally long). In such situations, an alternative choice is to outsource the test to an external laboratory. From the point of view of maintaining a high-quality validation plan, the implementation of the test internally or externally should not make any difference. To make this impact negligible, external tests should be treated like internal tests, i.e., they must be implemented based on verified/validated test methods, with a verified GRR< 10% (or conditionally <30%).
After completing the list of needed tests, defining the execution site, ordering the necessary and missing tooling components, we move on to the next question: how many parts of each variant, in each planned test, should be tested?
In the case of testing a product that is designed and made for a specific customer, the answer can be found in the specifications provided. However, if we are preparing a validation plan for multiple customers (NPI-type project), we have to make this decision ourselves.
A simple rule of thumb says, the more parts you test the more reliable test results you will get. But this rule does not always help in determining the number of parts needed for testing.
Let’s think for a moment, for every test, does the number of parts matter as much?
Example 1.
The material you plan to use in a product is supplied according to a manufacturing standard. This standard implies tolerance ranges for various parameters. In your validation plan, you have planned tests for MIN and MAX values for one of the critical parameters for the product you are designing.
The key question to ask in this example is: are you able to get from the material supplier, parts made within the upper (MAX) and lower (MIN) tolerance of the parameter?
Very often this is impossible, because the values given in the specification are the result of the influence of many factors, which the supplier is not able to precisely manipulate in order to achieve the exact value of the parameter.
What to do in such a situation? Give up on conducting the test?
Tools from the FEA (finite element analysis) group come to the rescue.
This is another type of test, in addition to physical tests, which is often an integral part of the validation plan – a virtual test.
For this type of testing, the key element is the numerical model used for the test. Its preparation requires at least several recalculations and adjustments (iterations), calculation of correlations to actual tests (at a high assumed level, e.g., 80%), and the assumption that material trends / tendencies are valid over the entire range between MIN and MAX values of the analyzed parameter. This is often the only method available, which, despite its high time consumption, especially for critical material or functional parameters, we should not abandon.
Example 2.
A common dilemma for design teams in the design validation phase is verifying the dimensional tolerance ranges placed on drawings. The dilemma is how to ensure that all components, regardless of whether they are delivered in the upper or lower tolerance range, deliver the planned functionality.
The first step in this type of analysis may be to determine the key functional chains of dimensions and focus only on them. Assuming that the other dimensions do not have a significant impact on product performance.
Dimension chains determined in this way should be analyzed using available tools (Tolerance Chain Management). This will simplify the physical verification of the entire chain of dimensions and their tolerances, to a single analyzed dimension in MIN and MAX values. When determining the dimension of the analyzed chain, it is worth thinking about and ensuring that in the validation phase we provide a component (or assembly) in the maximum and minimum value of this dimension.
The methods and tools I am familiar with that support the analysis of chains of dimensions and their tolerances assume, that the dimension measurements will have a normal distribution and a Cpk value of at least 1.33 or 1.64 for dimensions affecting safety (the value of this indicator can be defined by global or internal specifications. At the validation stage, we need to ensure that there are enough measurements of the parts under test to confirm these assumptions. You can read about how to implement this here https://blog.minitab.com/en/30-piece-capability-study-automotive)
After all the planned tests have been performed in the validation plan, the results obtained must be summarized. If the project team has established criteria for evaluating tests, the process should be short.
What to do if the test result is qualified as an NOK?
Start by analyzing all available data. It may turn out, that the way of collecting results was incorrect (wrong device or method or way of preparing parts), there is an error in the verification formulas (e.g. function ranges in Excel are adapted to a different amount of data), the entered results have a different unit or multiplier compared to the evaluation criterion, etc. After eliminating potential technical, methodological reasons, it is worth moving on to the analysis of the tested parts. Do they look as we expected? Has a component been destroyed that, according to calculations, should have been destroyed? Are the results obtained repeatable Cp > 1.33 or strongly dispersed? Is there a small group of parts that behaved differently than most of the parts tested?
The answer to these and similar questions can guide the team to the reason for receiving a negative test result. After making the necessary changes and eliminating the identified reasons, the test should be repeated.
Without identifying this reason(s), the team will not be able to modify anything in the procedure for conducting the test. Running the same test without any modification is the last scenario I encourage – due to the total lack of rationale for success. I also have in mind a situation where, after repeating the test under identical conditions, the test result is positive. If nothing has been changed why are the results different? Surely the project team is aware of the decisions it is making and can credibly argue its actions?
It is also possible that the NOK result is not caused by an error in the test procedure, incorrect preparation of parts for testing but is due to incorrect design assumptions, calculations or other mistakes or errors.
This is the role of the validation plan. It verifies that what the project team has prepared works as intended, defined and described in the documentation. If the results indicate that the product does not meet expectations, we have three scenarios to choose from.
The first is to revise the previous design work and try to change the product definition in such a way that subsequent test results are positive.
The second is to change (lower) the requirements for the product so that the test results confirm them.
The third is to close the project at this stage.
One of the questions asked at the beginning of the article is: Can the scope and definition of the test specification be changed between DV and PV?
Perhaps after reading this article you already have the answer….
My answer is this. If you want to observe how the work of the project team affects the characteristics of the designed product / service, then any change in the validation plan will make this observation more difficult. The smallest change, can be compared to changing the rules of the game during a game, making it difficult or even impossible to evaluate the final result.
Which doesn’t mean you can’t do it. You can. Just do it consciously, identify the risks associated with this decision and inform the project team.
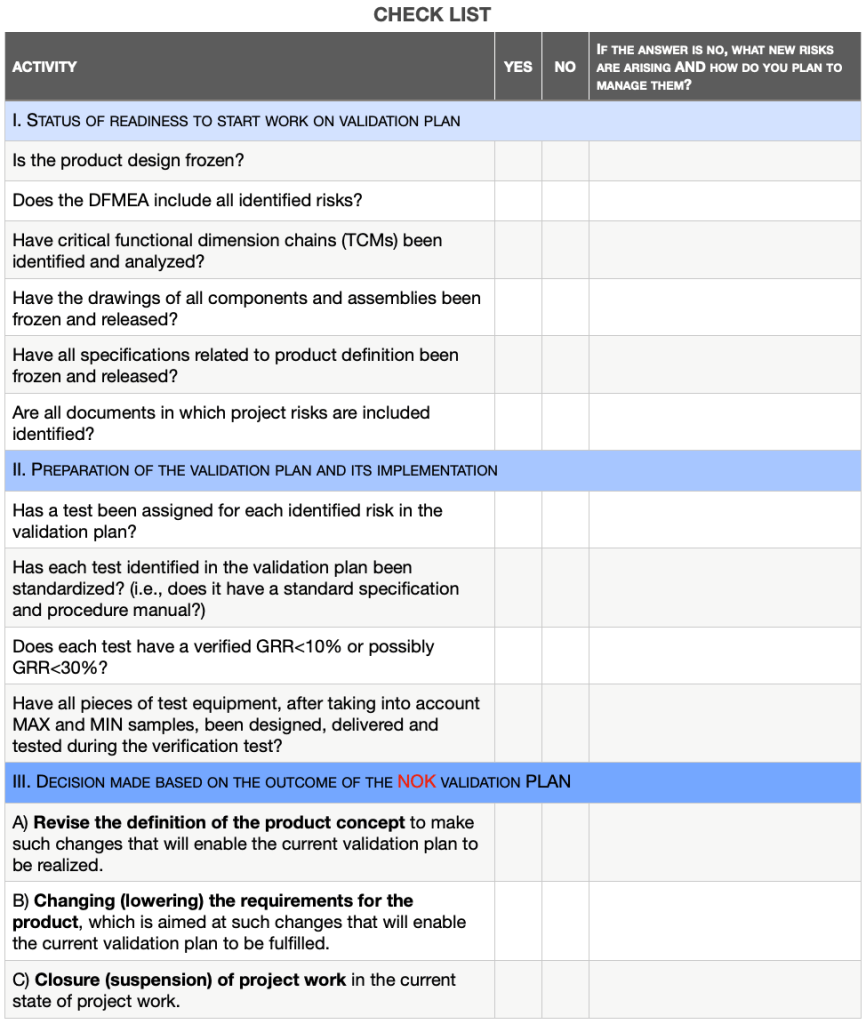
In order to systematize the steps in the process of preparing, implementing and completing the validation plan, I include a checklist that organizes the entire process.

Leave a comment